
A laptops or computers today rarely have physical parallel
or serial port. Everything has been replaced with an USB port that is now in
third generation (USB 3.0) with a data transfer speed rate up to 3.2 Gbps. Wow.
But unfortunately for interfacing freak, they won’t say 'wow', because data
transfer speed is not main factor, but ‘miscellaneous’ only. The important
thing is how to release digital logic '1' and '0' exit/enter to the computer to
be processed according to the program's objectives.
What is the meaning of 'interfacing' here? Interfacing is
such as ‘communication’ between two devices (or more) that works in a digital
world (only know the logic '1' and '0') with a controlled object which is
usually in analog quantities such as actuators and sensors. Simple example is
when you want to move a robotic arm with a computer. Here, the computer acts as
a control center and a robot arm as the object of control. How to become a
computer with only working on digital logic '1' and '0' to control a robotic
arm? That is called 'interfacing' J
Please keep in mind there three items to perform interfacing
activity. First, a program that performs all control process in computer, the
second is the data exchange, and the last is the port (COM) as the data
‘entrance’. Let us try to examine one by one according to 'interfacing between Arduino and Delphi' case study.
The first: application. For current case study, the
application that served as a control center in computer is written in Delphi. Beside
Delphi, you can also develop using Visual Basic, C++, Java or others. Why use
Delphi? Because it’s one of more popular SDK (Software Development Kit) in the
world I loved J.
The second: data exchange. For the data, it could have any
kind of data but in binary logical level. I’ll explain it as you go along. The
third: port as data entrance. Well, they are most important because as I
described in the first paragraph, it’s rarely computer equipped with parallel
or serial port for data exchange. One solution is using a converter, either usb
to parallel (obsolete too) or usb to serial. One of them is using a
microcontroller to act as 'slave' that translates command from computer
simultaneously. Another is using V-USB technique by issuing data to a USB port
via libUsb driver. This method requires a microcontroller burned V-USB firmware.
The difference, first technique actually using USB data frames sent to the
external device, unlike the second option that converts into a classic serial
protocol into USB payload. Okay, for easier we will choose second method and
using Arduino as serial-ready board.
Interfacing Arduino-Delphi Block Diagram
Here is interfacing
between Arduino and Delphi block diagram. I hope the picture below can
illustrates what is ‘interfacing’ and how to do that.

Preparation on Arduino Side
For experiment, prepare an Arduino Uno, USB cable (type-B) and
a PC / laptop. For example, we will try to
turned on/off internal LED that exist in Arduino Uno board (pin numbers 13) controlled
by a executable application in laptop (written in Delphi). This program is
intended as a simple representation of 'interfacing' in digital to analog world.
Then, you could develop it for more complex applications, such as connects Arduino
to other actuators (ex: motor driver for moving a robot arm). Here are all steps
to on/off internal LED Arduino board on pin 13:
Upload Arduino sketch as follows to handle serial
communication. The essence of this sketch is to process incoming serial data to
Arduino and then turned on/off LED as corresponding command immediately
void setup() {
pinMode(13, OUTPUT);
digitalWrite(13, LOW);
Serial.begin(9600);
}

void loop() {
if (Serial.available()) {
 char command = Serial.read();
 Serial.println(command);
 if (command=='0'){
  digitalWrite(13, LOW);
 }
 if (command=='1'){
  digitalWrite(13, HIGH);
 }
}
}
Preparation on Computer Side
We need prepare our computer in order to have ability to
send or receive data to Arduino. We can’t control some loads directly using
computer. We need Arduino to ‘translates’ our command in serial data to ‘parallel’
data to the loads.
Here we go. First, install Delphi and TComport component.
This component is used to communicate with other devices through serial port, either
in physical or virtual serial ports they are. As notice, you should install the
right TComport with Delphi version in order to work properly. For example, for
Delphi XE2 below you can install TComport 3.1 but for Delphi Xe3 above you must
install TComport 4 or newer.
In installer file of TComport, there is ComExample.dpr file
in ‘Examples’ folder. Open the file within Delphi, then execute by pressing F9
key. You can make your own program, but I recommend to using this example
program for first time, so if you meet a problem, it’s not caused by the Delphi
(perhaps a cable connection or on Arduino side).
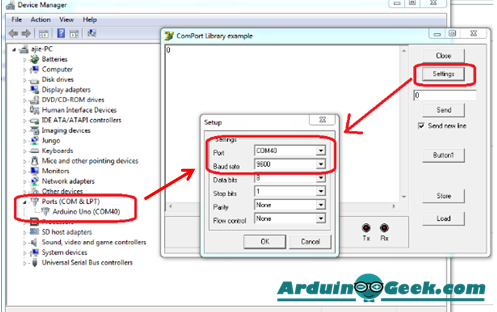
Press ‘Settings' button, then enter COM port belongs to
Arduino USB (you can see in 'Control Panel-System-Device Manager') and enter
baudrate at 9600 bps. Then press 'Open' button to start opening serial port
connection to Arduino.
Further, input numeric character '1' in edit box above 'Send'
button and see the changes on Arduino board. There should internal LED will
continue lights on there. Next, try to enter '0' character in edit box and
press the 'Send' button. The LED is supposed to be lights off.


Done. Please keep in mind, we just did a low level
interfacing programming which means we also need to know electrical
characteristics of the hardware. In example above, we tried to transfer commands
from laptop to turn on/off Arduino’s internal LED, with intermediary of USB
cable. Well, if you have any questions please fill comment out below.
A blogger, electro-hobbyst, freelancer n technopreneur. I'm an Indonesian, I did my best to make tutorial without spelling errors, please CMIIW or if something burned your eyes..
ConversionConversion EmoticonEmoticon