
Sometimes our Arduino circuit requires a cooling system so all
components are not overheat. High temperatures can cause permanent damage to
the device. In the short term, your device is easy to hang without being able
to predict when it will happen. As you know, all electronic components we use
is commercial grade instead of industrial or automotive, so it’s only withstand
a temperature below 600 C.
Back to the topic, at this moment I will explain how Arduino
controls a 12V DC fan programmatically. This controlling is for ‘on’ or ‘off’
only, instead of speed controlling. Usefulness of the controlling system is, for
example, to switch on the fan when temperature is detected high and turn it off
when reach normal temperature. Of course, for this case you need a temperature sensor.
But this tutorial for a while just discuss about How to control DC Fan 12V Using Arduino only, while its combination
with temperature sensor will be explained in next tutorial.

To control a DC fan with Arduino, you should use a 'driver'
circuit. The circuit is used as a 'bridge' between the Arduino that works in
digital level 95V) while DC fan (load) is working at 12V voltage level and high
current (magnetic component generally require a large current). So the first step
is to learn load characteristics would you drive from Arduino. In this case
study we will control the load is a DC FAN with voltage: 12V, current: 0.17 A
specifications. Next step is to design a series of its driver.
Tools and materials:
1. Arduino board (Uno or another)
2. DC Fan 12V / 0,17A
3. Transistor BC547
4. Diode 1N4002
5. Resistor 1K
6. Some cable jumper
Arduino-DC Fan Driver Circuit
Here is a simple circuit driver DC Fan to Arduino.
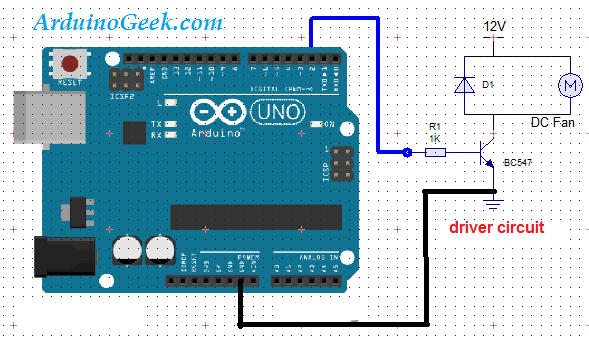
Notice in the picture above that we would 'raise' digital
voltage level Arduino with a transistor. So transistor here we functioned as an
electronic switch, i.e. by utilizing the characteristics of the transistor
itself. As we know, the transistor characteristics are: if the base emitter
voltage gets above cut-off voltage, the current will flow from the collector to
the emitter pinout. From datasheet reference, cut-off votage of the transistor is
0.7 V so it matches with maximum Arduino’s voltage level.
Component Selection
How we choose capable transistor for passing DC fan current
required to be spinning? Of course as I mentioned earlier in DC-Fan’s specification,
the required current is 0,17A (170 mA). So we use a transistor which must be
greater than 0,17A. Try to use 5x larger current capacity transistor, so the
transistor won’t overheat or damaged. For this needs, I usually use a BC547
transistor, which if we look at datasheets, its current capacity is 1A (1000
mA). So BC547 transistor is already suited to our needs.
Consider again to circuit picture above. Notice there is a
diode 1N4002 there. So, what’s the functionality of this diode? It’s used to
protect the transistor from surge voltage generated by wild inductance magnetic
in DC Fan’s motor coil. So the diode here is not act as a AC voltage rectifier,
but as a surge protector.
Arduino-DC Fan Sketch Handler
Well, if the driver circuit is ready, next step is to fill Arduino
firmware (sketch) that can control DC fan in on / off status. It’s very easy,
simply issued 'HIGH' logic to pin that is connected to the driver circuit to
turn on the DC fan, or 'LOW' logic to turn off. HIGH voltage logic will issue a
digital voltage 5V which will activate transistors as electronic switches.
How do I expend Arduino voltage logic HIGH or LOW? It's pretty
easy J. Simply using the syntax:
digitalWrite (pin, logic);
Example for circuit picture above:
digitalWrite (2, HIGH); // To turn DC fan
digitalWrite (2. LOW); // To turn off the DC Fan
Thus, a brief of How
control DC fan 12V Using Arduino tutorial, may be useful for the needy. If
you have any questions, please post a comment below. Last, the driver circuit above
is not only can be used for the DC fan, but can be used to drive other loads
such as relays, DC motors, etc as well. Just keep in mind the transistor
current capacity must be higher than load requirement for durability of your
circuit.
A blogger, electro-hobbyst, freelancer n technopreneur. I'm an Indonesian, I did my best to make tutorial without spelling errors, please CMIIW or if something burned your eyes..
ConversionConversion EmoticonEmoticon