
I2C LCD 16x2 module is controller module for LCD
16x2 which is dealing with I2C/IIC (Inter Integrated Circuit) synchronous
serial protocol. In other reference, I2C protocol often called as
TWI (Two Wire Interface). Normally, the LCD module is controlled by parallel lines
of data and control paths. However, parallel lines will take a lot of pins on controller
side (e.g. Arduino), at least you will need 6 or 7 pin for controlling an LCD
module. Thus for a ‘busy’ controller and have to control a lot of I/Os, using
parallel paths is incorrect solutions.
For example, an Arduino Uno board has 13 digital pins. If
you use a half to control LCD module means you only have about 6 or 7
alternative pins for controlling other devices, such as DC motors, light
sensors, keypads, or other I/O devices. So by changing the LCD control path
from parallel to serial (I2C), then you will only need a 2-wire line
alone (plus a ground cable) to communicate with LCD module.
I2C LCD 16x2 - Arduino Communication Protocol
Arduino already supports I2C communication
protocol. In Arduino Uno board, I2C ports are located on A4 pin for
line SDA (Serial Data) and A5 pin for SCL (Serial Clock). Please don’t forget
to connect ground (GND) wire between Arduino and I2C device. At software
side, Arduino’s built in library help us to deal with this protocol. This library
is named 'Wire.h' and will be used to convert parallel data lines into the I2C
LCD module. You can manually do it, but if you don’t want to be bothered, you
can easily do so using ‘LiquidCrystal_I2C.h’ library (along with ‘LCD.h’ library).
You can download both libraries for free here and here.
There is no LCD module that has I2C port (at least I have
not found). Thus, we will continue to use common LCD module (data
communications in parallel path), but we'll convert it using I2C converter
module as shown in picture below.
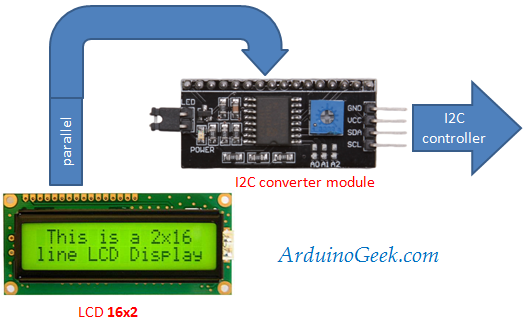
This converter is powered by PCF8574 chip as controller which
is a shift register actually. For data communication flow, indicated by the
figure below

I2C LCD 16x2 - Arduino Wiring
While wiring circuit is shown by picture below.

I2C LCD 16x2 - Arduino Sketch
For firmware side, you should simply define ‘LiquidCrystal_I2C.h’
library at the top of your sketch. Furthermore, the entire function contained
in this library can optimize your work. Here is an example of Arduino sketch to
display some text in LCD 16x2 module with the intermediaries of PCF8574 I2C
converter.
#include <Wire.h>
#include <LCD.h>
#include <LiquidCrystal_I2C.h>
LiquidCrystal_I2C lcd (0x27,2,1,0,4,5,6,7);//0x27= default address of I2C module
void setup ()
{
lcd.begin (16,2); // LCD 16x2
lcd.setBacklightPin (3 POSITIVE);
lcd.setBacklight (HIGH);
}
void loop ()
{
lcd.clear ();
lcd.home (); // Set the cursor to 0,0
lcd.print ( "Hello World");
lcd.setCursor (0.1);
lcd.print ( "ArduinoGeek.com");
delay (1000);
lcd.setBacklight (LOW); // Backlight off
delay (250);
lcd.setBacklight (HIGH); // Backlight on
delay (1000);
}
You need to look at line [1-3] is used to define Wire.h, LCD.h
and LiquidCrystal_I2C.h library. Second library is mandatory if you will deal
with I2C LCD. Furthermore, we need to create an instance of 'lcd' in class of 'LiquidCrystal_I2C'
library. Notice that parameters of this class show I2C module
address, control and data parameters. For module address, it uses 27H (0x27) as
default. Why it uses 27H as default address and how to change it if you
interface with more than one I2C module converter, will explained in next
tutorial J
Next we need to initialize the LCD module within the block
void setup. Notice in this block, we define LCD that we use is ‘16x2’ type,
then we set the brightness/backlight. In next line we will clean the LCD
display, toward to (0, 0) coordinates of LCD, write down "Hello Word”
display text to the LCD, set the cursor to the coordinates (0, 1) which means
column 0, row 1 (the second row of LCD), displays 'ArduinoGeek.com' text, and
gave the little animation effects by turning on and off the backlight.
A blogger, electro-hobbyst, freelancer n technopreneur. I'm an Indonesian, I did my best to make tutorial without spelling errors, please CMIIW or if something burned your eyes..
ConversionConversion EmoticonEmoticon